Posted in: LinkPoint Connect, Microsoft Outlook + Salesforce, Resources
I hear a number of the same questions from new (and existing) LinkPoint360 customers as they work to get up and running with our software. After all, setting up software that connects two completely different systems can be a bit confusing at first. Add to the mix users who are new to integrating Outlook and Salesforce, a displaced workforce adjusting to a blend of home and office machines, and no time to spend trying to make heads or tails of a system.
That’s why I’ve put together this article as a Beginner’s Guide to LinkPoint Connect.
Read This First: The majority of our clients are working with LinkPoint Connect for desktop installation, so that’s what I will cover here. If you are using Mac, mobile, or other platforms that look a bit different, never fear. You can email customersuccess@linkpoint360.com, and my team can provide resources and direction if you need it.
Now, let’s get started with getting started!
Installation
LinkPoint Connect installs locally on the desktop. It can also be deployed by a company’s IT team using software distribution tools or virtual desktop platforms. In all instances, we provide customers with .exe and supporting files.
You should receive the link to download the software in your Welcome Email. Customers with a custom installer will receive their files directly from our Professional Services team.
Can’t find your installer file? Fill out our Customer Access Form.
Authentication
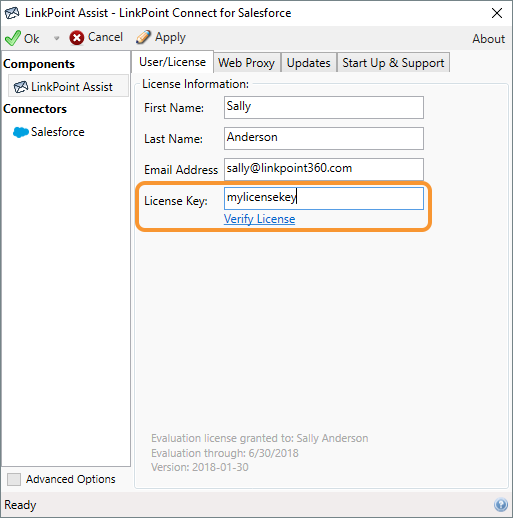
This two-step process only takes a few minutes. After you install, you should be prompted to enter your information and unique license key.
Once that is verified, you need to connect your Salesforce account. This is what allows our tool to present CRM items and record your emails.
Here is a help article with step-by-step instructions to guide you.
Record an Email
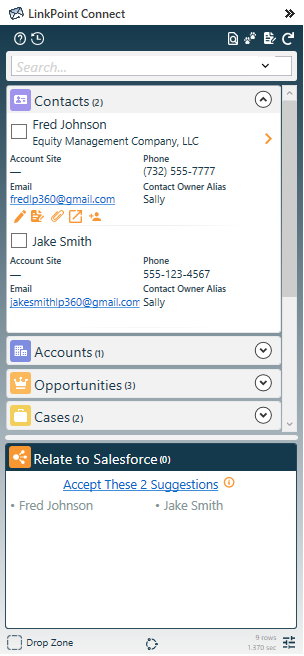
Our latest version simplified email recording and moved it to the Side Panel. To add an email to Salesforce, simply check the box next to any record.
This instantly records the item to the CRM. You can also use these checkboxes to record outbound emails. The tool will record the email as soon as you hit the Send button.
Find a Record
Whenever you select an email from an existing Salesforce Contact or Lead, the Side Panel will show you matching records in real time. You can always use the Search Bar to find a new record, or click the > icon to view more Record Details and extra information.
Create a Record
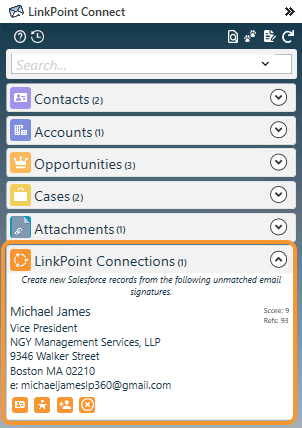
Working with a contact that isn’t in Salesforce yet? No problem! Click the Create Contact icon in LinkPoint Connections, and we’ll autofill a form for you based on the email signature.
You can review, edit, and verify all of the details. And any field validation or required fields will still need your attention. Click the green checkmark to save the record instantly to Salesforce…and now you can record emails to it!
Edit an Email Subject Line
Want to change how an email appears in Salesforce when you record it? Click the View Salesforce Fields button on the Side Panel. You can edit the subject and body of the email so that it more accurately tells a story when you or colleagues view it in Salesforce.
Don’t see this option? You might need to enable it. Just go to Edit Preferences > Advanced Preferences and select the option to Edit the email subject and body.
Recording Attachments
Adding files to Salesforce is also flexible based on your needs. Record an email, then find the attachment listed in the Side Panel. Check the box for the attachment to record it to wherever you already recorded your email.
Only want to record an attachment? You can drag and drop a file to any paperclip icon in the Side Panel. This will upload the file to Salesforce automatically.
Tips and Tricks
Looking to get more out of LinkPoint Connect? Read up on these included features that can take your Salesforce integration to the next level:
Email Templates: Merge fields and streamline frequently used emails
Meeting Notes: Update Salesforce with preconfigured field updates
Book a Meeting: Share your calendar availability to simplify scheduling
Configure Settings: Edit your preferences to refine how you use the Side Panel
Still have questions? You can explore our Knowledge Base for more tips and feature explanations. We also have a number of training videos on our YouTube Channel. Our Customer Success Team is also on hand to provide best practice advice or point you in the right direction.